

Integrate our secured widgets
Leapa offers solutions to merchants who already have their business websites. Leapa provides smart widgets to integrate to your website to make it easy to capture customer information and payment methods while meeting and reinforcing security standards. Never worry about handling sensitive payment data as we encrypt and channel them to our secure servers from your customer's browser directly.
The leapa-customer widget
The leapa-customer widget allows you to safely capture customer's payment information by simply adding a few lines of code to your website.
This widget has two modes of operation, it’s a property that can be set to add to save customer’s identification and payment methods or set to charge to charge the customer’s card.
By default, these are the required attributes for each mode
Add mode:
- First Name
- Last Name
- Card information (number, expiry date and cvc)
- Name on card
- Address
Charge mode:
- First Name
- Last Name
- Card information (number, expiry date and cvc)
- Name on card
- Address
- Amount
- Currency
- Description
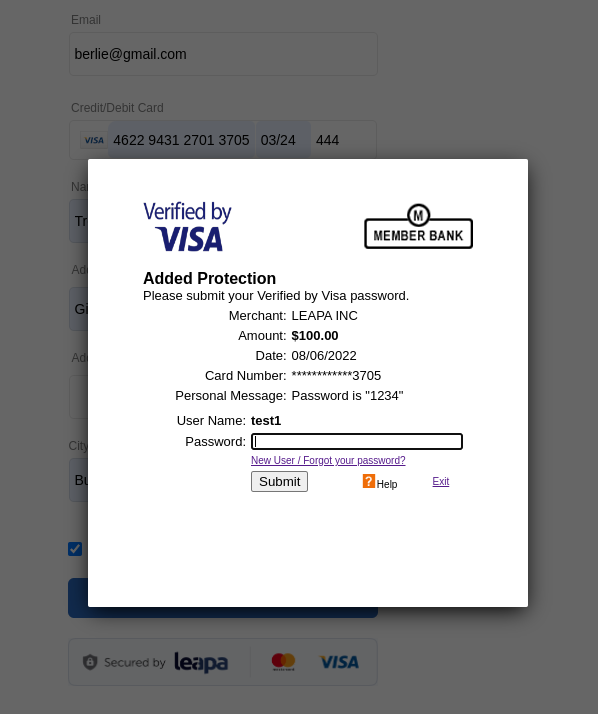
Cardholder authentication using 3D Secure
Before we go into the details on how to use the widget, we would like to shed some light on the 3D secure(which is an additional layer of authentication used by merchants to ensure a purchase is from a legitimate cardholder).
Thanks to the increasing popularity of ecommerce platforms, many card transactions that previously would have occurred in person can now be made online. The resulting rise in card-not-present (CNP) payments offers greater convenience for those initiating the transaction and can require less from merchants, who no longer need to have a brick-and-mortar store or hire designated employees to accept payments. However, the downside to this digital modernization is that it makes instances of payment card fraud more prevalent and more difficult to stop.
To reduce the risk of fraud, identity theft, and other illegitimate practices associated with these types of payments, a growing number of online merchants worldwide use 3DS at checkout to match the identity of the shopper with the cardholder.
The additional 3D Secure step at checkout typically involves showing the cardholder an authentication page on their bank’s website, where they’re prompted to enter a verification code sent to their phone or email. This process is familiar to cardholders through the card networks’ brand names, such as Visa Secure and Mastercard Identity Check.
Example of a 3D Secure flow
Step 1: The customer enters their card details.


Step 2: The customer’s bank assesses the request and can complete 3D Secure at this step.

How to use the widget
1. Adding a customer
Alpha Solutions Inc. has a website and wants to gather customer information using the Leapa widget. The first step is to include the widget script and stylesheet tag in the header.
<!-- Leapa Widget CSS -->
<link rel="stylesheet" href="https://widgets.leapa.co/customer.css" />

<!-- Leapa Widget JavaScript -->
<script type="module" src="https://widgets.leapa.co/customer.js"></script>
The second step is to add the widget snippet itself on the page where you want it to be displayed.
<leapa-customer
  id="leapa"
  mode="add"
  first-name="true"
  last-name="true"
  tos="true"
  currency="USD"
  description="Test description"
  badge="light"
  api-key="eyJhbGciOiJIUzUxMiJ9.eyJtb2RlIjoidGVzdCIsImRlZmF1bHRBY2..."
>
</leapa-customer>
As you can see in this example, the following attributes were set:
- An API key is generated from your Leapa account settings. Make sure to use the right key for the right currency account
- The mode is set to
addif you would like to only add customers in your Leapa account and charge them later - First and last names are set
trueto display the corresponding fields on the form - TOS is set to
trueto display the terms of service checkbox - A badge is set to
lightto display the Leapa badge on the widget.
Note that If you need to use multiple widgets on the same page, you have to set different values for the id for each widget; in this example we set the id as
leapa.
The widget UI can be customized for instance by changing the text or color of labels and buttons. Refer to the attributes table for details. You can set attributes values depending on your needs.
The following screenshot is a result of what is set on figure above.


2. Charge a customer
If you want to capture a customer’s payment directly, you need to set the mode to charge. In addition to the required attributes in add mode, you will need to also set the amount, currency and description of the charge. All other attributes are optional.
<leapa-customer
  id="leapa"
  mode="charge"
  currency="USD"
  amount="100"
  first-name="true"
  last-name="true"
  tos="true"
  description="Test description"
  badge="light"
  api-key="eyJhbGciOiJIUzUxMiJ9.eyJtb2RlIjoidGVzdCIsImRlZmF1bHRBY2..."
>
</leapa-customer>
Here is how the widget renders in charge mode give the attributes set on figure above:


3. Event listening
You will need to add an event listener to handle responses from the widget. As shown in the snippet below, the events are available in two states: onSuccess is fired in case of successful response and onFailure in case of a processing failure.
Here is a code sample of the event listener:
<script>
  document.getElementById("leapa").addEventListener("onSuccess", (e) => {
    // event listener for when action is successful
    console.log(e);
  });

  document.getElementById("leapa").addEventListener("onFailure", (e) => {
    // event listener for when action fails
    console.log(e);
  });
</script>
This gives you control on the operations to perform based on events responses. If for example the operation of adding a customer succeeds (onSuccess), you can retrieve the customer ID created, save it in your database and later use it to create a charge request through the API.
Another common use case would be to hide the widget and show a success or failure message on your website when the widget operation is completed or redirect the user to a different web page or application screen.
Event listener responses
Add mode: when the form is submitted, the widget returns a CustomEvent object in the response, which is structured like below:
{
   isTrusted: false
   bubbles: true
   cancelBubble: false
   cancelable: false
   composed: false
   currentTarget: null
   defaultPrevented: false
   detail: {customer: {…}, source: {…}}
   eventPhase: 0
   path: (5) [leapa-customer#leapa, body, html, document, Window]
   returnValue: true
   srcElement: leapa-customer#leapa
   target: leapa-customer#leapa
   timeStamp: 343869.19999999925
   type: "onSuccess"
}
and if it's a successful response, a customer and source objects will be included in the detail field. Take a look at the highlighted line on the above code snippet for reference.
The customer and source objects, are the same as the ones returned in the response of a POST request to the /v1/customers endpoint of the API, they are structured like below:
{
   // customer object
   address: {object: 'Address', city: 'Bujumbura', …}
   birth_date: "2010-10-20"
   email: "customer@email.com"
   first_name: "Tresor"
   id: "616820c258284cbbb87abe6fd9b9bd5a"
   is_live: false
   last_name: "Muco"
   merchant_id: "99035d7b1bc644bbac854d72dc1ff73f"
   merchant_name: "Tenscores"
   mobile: "69151210"
   object: "Customer"
   referenceId: null
   sources: null
   status: "active"
}
{
   // source object
   address: {object: 'Address', city: 'Bujumbura', …}
   brand: "visa"
   card_holder_name: "Muco Tresor"
   currency: "USD"
   customer_id: "616820c258284cbbb87abe6fd9b9bd5a"
   cvc_check: "unchecked"
   exp_month: "03"
   exp_year: "2023"
   fingerprint: "7010000000076961111"
   holder_type: "individual"
   id: "2c72e224e39144598d7e8293dc7c09a1"
   is_default: true
   last_four: "1111"
   object: "account"
   statement_descriptor: "TENSCORES"
   status: "created"
   token: null
}
Status codes of expected responses are:
201 - Created401 - Unauthorized403 - Forbidden404 - Not found
For more details on the responses , please refer to our API documentation on creating a customer.
Charge mode: when the form is submitted, the widget returns a CustomEvent object in the response, which is structured like below:
{
   isTrusted: false
   bubbles: true
   cancelBubble: false
   cancelable: false
   composed: false
   currentTarget: null
   defaultPrevented: false
   detail: {charge: {…}}
   eventPhase: 0
   path: (5) [leapa-customer#leapa, body, html, document, Window]
   returnValue: true
   srcElement: leapa-customer#leapa
   target: leapa-customer#leapa
   timeStamp: 60454.300000000745
   type: "onSuccess"
}
and if it's a successful response, an invoice object will be included in the detail field. Take a look at the highlighted line on the above code snippet for reference.
The invoice object is the same as the object returned in the response of a POST request to the /v1/invoices endpoint of the API, it is structured like below:
{
	"amount": 0,
	"amount_due": 0,
	"attempted": 0
	"charge": {...}
	"currency": "BIF",
	"customer": {...},
	"description": "string",
	"due_date": 0,
	"id": "string",
	"isAutomatic": true,
	"is_live": false,
	"is_manual_payment": false,
	"issue_date": 0,
	"merchant": {...},
	"number": "string",
	"object": "string",
	"pdf_url": "string",
	"products": [...],
	"reference_id": "string",
	"source_id": "string",
	"statement_descriptor": "string",
	"status": "draft",
	"url": "string"
}
Status codes of expected responses are:
201 - Created401 - Unauthorized403 - Forbidden404 - Not found
For more details on the responses returned by the charge mode, please refer to the API documentation.
Handle failed charges
If you are using the widget in charge mode and let's say for example a customer is trying to make a payment with a card that has an insufficient amount. The charge will fail and you need to let him know what's wrong with his card.
In the event listening section, we have seen that the events are available in two states: onSuccess and onFailure. We return information about the reason why a charge has failed in the response of the event listener that has the onSuccess state.
To get that information, you will need to look for two fields:
failure_code: a constant code for the reference of the failed chargefailure_message: a description of the failure code
You can find them in the charge object, which you can see in the detail object returned in the CustomEvent object.
Take a look at the highlighted lines on the below code snippet for reference.
// CustomEvent object
{
   isTrusted: false
   bubbles: true
   cancelBubble: false
   cancelable: false
   composed: false
   currentTarget: null
   defaultPrevented: false
   	detail: {
		charge: {
			failure_code: "INSUFFICIENT_FUND",
			failure_message: "Decline - Insufficient funds in the account.",
			...
		}
	}
   eventPhase: 0
   path: (5) [leapa-customer#leapa, body, html, document, Window]
   returnValue: true
   srcElement: leapa-customer#leapa
   target: leapa-customer#leapa
   timeStamp: 343869.19999999925
   type: "onSuccess"
}
Common failures
| Failure code | Failure message |
|---|---|
INVALID_ACCOUNT | Decline - Invalid account number |
PROCESSOR_DECLINED | Decline - General decline of the card. No other information provided by issuing bank. |
INSUFFICIENT_FUND | Decline - Insufficient funds in the account. |
UNAUTHORIZED_CARD | Decline - Inactive card or card not authorized for card-not-present transactions. |
INVALID_CVN | Decline - Invalid Card Verification Number (CVN). |
CONSUMER_AUTHENTICATION_FAILED | Encountered a Payer Authentication problem. Payer could not be authenticated. |
Example
Let's handle and alert a message if, for example, a user has entered the wrong CVN of his card.
Start by querying the Leapa widget element by the ID you specified and attach it to the onSuccess event.
<script>
  const leapaWidget = document.getElementById("leapa");

  leapaWidget.addEventListener("onSuccess", (event) => {
    // code to handle failed payment
  });
</script>
And then add the logic to handle the failed payment in the event callback function.
<script>
  const leapaWidget = document.getElementById("leapa");

  leapaWidget.addEventListener("onSuccess", (event) => {
    const charge = event.detail.charge;

    if (charge.failure_code === "INVALID_CVN") {
      alert("You have entered the wrong CVN.");
    }
  });
</script>
As you can see in the highlighted code above, we started by grabbing the charge object returned in the event. Then we check what is the failure code and give back to the user a friendly message.
Here we are using the alert function but you can also raise a beautiful toast notification.
Widget properties
The following list is a set of configurable properties to tune the component.
A
dynamicproperty has a text input field associated with it and accepts non-boolean values in the widget code snippet. If the property value is different thantrueorfalse, then the associated text input field becomes hidden on the widget UI.
| Property | Default | Dynamic |
|---|---|---|
idoptional | No | |
keyrequired | No | |
badgeoptional | light | No |
emailrequired | Yes | |
first-namerequired | false | Yes |
last-namerequired | false | Yes |
addressoptional | false | No |
doboptional | false | Yes |
mobileoptional | false | Yes |
tosoptional | false | No |
moderequired | No | |
amountoptional | No | |
descriptionoptional | No | |
invoice-idoptional | No | |
customer-idoptional | No | |
button-textoptional | Save | No |